Introduction:
I keep in mind a long time back when I joined ‘more serious’ photography gatherings. The to begin with thing that shocked me was the super-soft foundations behind the pictures on show. I immediately knew that I needed to do the same, no matter what!
Later I learned that a delicate foundation is not continuously a positive thing – it moreover has a negative side. It is something that must be photeeq depth of field controlled. But how is that done? By controlling something called ‘depth of field.’
What is the profundity of field in photography?

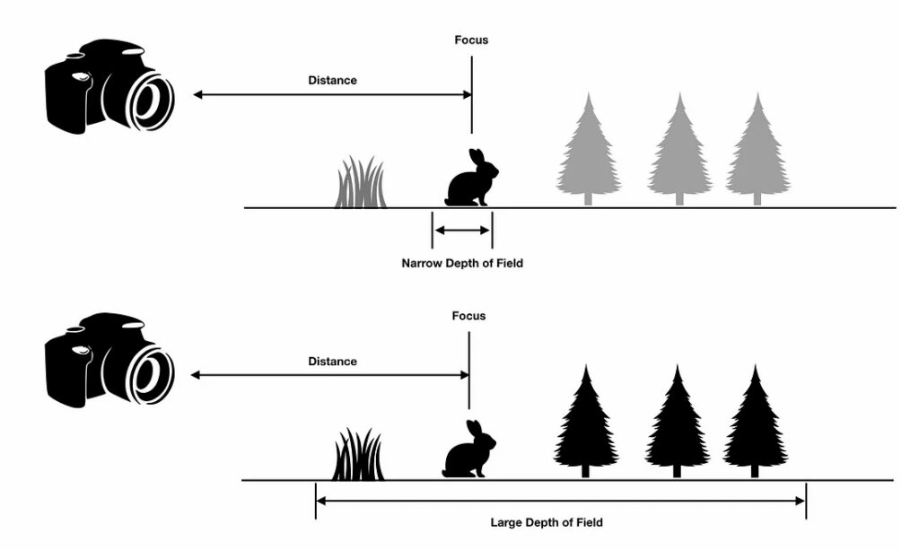
The profundity of field is what will stay in center and acceptably sharp in any given photo. Everything inside the profundity of field will be flawlessly sharp. This dof compares to where we center with our camera foundation, which can either be at a exceptionally particular subject separate (in which case each question parallel to the pivot of the sensor/film plane as well as those behind or in front of it will moreover drop on this plane) or, if it’s more commonsense, at an zone covering a certain precise extend around the point we have chosen for exact images.
If that zone is huge sufficient at that point objects touching either side of the plane of center – but lying past a certain separate from it – will too show up exceptionally sharp. But if there isn’t adequate room to suit the aggregate of both, and objects past the distant boundary come into play, at that point we will see their appearance developing less and less unmistakable as we see at them until they in the long run vanish from see inside and out. In this case, they will show up as in spite of the fact that out of focus.
The remove between what is closest to the lens/sensor plane that shows up in most honed photographs and those components which are obscured but obvious changes from one scene to another based on various components such as how distant absent objects are from us or each other, the central length of the focal point utilized, chosen opening, etc.
Depth of field and focal point gap estimate: an overview
The more noteworthy the remove between what photeeq depth of field is unmistakable in the center point and objects drifting exterior it, the closer you reach shallow profundity of field. This wonder comes about from how light voyages through space; if we consider light beams as straight lines (which they aren’t) at that point those components lying encourage absent from us will moreover drop on their amplified directions coming about in them showing up less particular than what lies promptly some time recently or after them on either side.
This impact gets to be indeed more articulated when utilizing little gaps, where the space past will be so thin driving to a obscured foundation. If on the other hand, we utilize wide gap settings at that point there will be much more room for more light to fit into, permitting them to cover a more noteworthy volume of remove some time recently they begin losing their distinctiveness.
Therefore you reach shallow profundity of field with focal point opening measure and with objects lying indeed encourage absent from us showing up progressively in center. The realistic here outlines this impact by appearing a profound profundity of field shifts on whether we’re utilizing wide or littler gaps; you’ll see that objects lying past the central plane (past what is obvious and sharp) gotten to be progressively out of center as we begin making utilize of the littler aperture.
Depth of field and focal point central length: an overview
The more capable our focal points, the more noteworthy will be their capacity to capture light. This comes about in such quick glass being able photeeq depth of field to offer both wide opening settings as well as tall optical execution over the whole centering run – from close to interminability – which permits for objects lying at any center separate from us to show up sharp.
But if we need to keep up this quality of photographs and definition over expansive swathes of space, there is exceptionally small room cleared out on either side of what is in center some time recently a foundation obscure begins… coming about in shallow profundity of field.
This impact gets to be especially articulated when utilizing fax focal points (which are competent of capturing a much littler volume of encompassing space) and with a bigger field of see (the contrast between the most limited and longest outline measure, as given by our optics – making it conceivable to capture a more decreased point of view).
Depth of field and longer central length: technicalities
It doesn’t matter whether we’re utilizing a fax or wide point focal point: both can give us with either profound or shallow profundity of field. The as it were figure that comes into play is the subject separate between our camera and what we’re photographing.
If we need to capture both closer view and foundation objects at their supreme best, at that point our center point needs to be situated to lie near sufficient to them both (as much as possible).
This implies utilizing shorter central length focal point for wide point focal points shots – where there is small room cleared out past what we’re centering on where there is a parcel more space around the fundamental subject that will permit it to fit into a littler frame.
The circle of confusion
The circle of perplexity altering is a calculate that’s straightforwardly connected to how much detail we’re going to be able to render inside the picture. Basically this alludes to how huge objects show up when seen from a given remove – i.e. on-screen or through print which can shift concurring to our hardware and the way we select to show them.
For case, if you have a expansive screen at domestic or appreciate looking at prints of your photos on the divider, at that point check that all major points of interest are rendered cleanly sufficient for them to be able to stand out without photeeq depth of field getting misplaced in the by and large picture. To decide what objects require to be inside an picture for this to happen, you can utilize something called the “circle of perplexity limit”.
This is based on our planning seeing remove, with shorter central lengths requiring littler limits than telephotos due to their decreased point of see (and in this manner scale). The standard esteem for 35mm film photography ordinarily ranges from 0.025mm – in spite of the fact that computer projection frameworks tend to capture littler pictures – through to 0.10mm for high-end computerized screens.
The significance of profundity of field
Depth of field is a principal property of all photographic pictures and the more extensive you can make yours, the more imaginative alternatives you’ll be able to investigate. Once your pictures show up sharp from front to back – giving them that “3D” feel to lock in watchers with what they’re seeing, or maybe than centering on any flaws such as camera shake or center mistakes which something else might have been present.
The hyperfocal separate & profundity limits: A valuable instrument for anybody attempting to discover a adjust between center and background/foreground composition is called the hyperfocal separate. This figure speaks to the point at which centering on anything past will put it past our profundity of field boundaries – guaranteeing that everything from half this remove through to limitlessness is captured inside idealize focus.
Having said that, unless you’re shooting with an amazingly wide point focal point or are capturing a scene with small profundity of field in the frontal area or foundation, at that point there’s no ensure that each portion of your picture will be adequately sharp for this to be valuable (on the off chance that you need to know photeeq depth of field more almost why this happens, check out my article on the circle of perplexity limits).
Deep vs limit profundity of field
Using a huge gap will give more noteworthy levels of detail compared to littler ones. As such, I would prescribe utilizing this strategy as long as you’re comfortable with the central length being utilized – which needs to be considered concerning camera settings.
The inverse is genuine when working with a limit profundity of field. In these cases, utilize a littler gap so that everything inside the outline remains sharp – indeed if it’s distant absent from your fundamental subject. You may moreover require to reposition yourself based on how near or distant absent from your subject you are.
Ultimately, what things most is the see and feel of an picture – not fair how it highlights on screen/ media. Working inside a bigger profundity of field may not be reasonable for capturing a awesome representation but that doesn’t cruel it’s not worth attempting.
In the same way, working inside a limit profundity of field can be challenging – particularly if you’re working at a separate from your subject – so don’t be perplexed to test with diverse levels of sharpness or utilize other strategies to accomplish the craved profundity of field.
Depth of field: Bottom-line
When considering around what you’re attempting to accomplish, it’s too worth noticing that something showing up sharp doesn’t essentially cruel that it is. This can be particularly genuine when working with expansive openings as littler objects may obscure for the advantage of bigger ones – which are on closer review more defined.
As long as you have a few level of control over photeeq depth of field your environment, being able to amplify the profundity of field will continuously give a more prominent profundity of field compared to working inside a limit or shallow one. In any case, this comes at the cost of opening so consider these components some time recently getting started.
Take into account diverse separations with numerous cameras and more detail, great presentation, and the post handling organize. Ideally this field instructional exercise made a difference. A scene picture taker can test with a obscure spot and diverting background.
Avoid Utilizing Channels All The Time
Too numerous individuals have a propensity of utilizing channels amid scene photography shoots. You need to do your best to maintain a strategic distance from utilizing channels all the time since channels as a rule make delicate pictures. Not as it were that but sharpness is regularly diminished as a result of utilizing filters.
If you utilize channels for impacts, at that point by all implies proceed to do it. Be that as it may, take copy pictures without utilizing a channel. As time goes by, you’ll begin taking superior pictures and you won’t require to utilize channels as much as you utilized to.
Shoot Close Nightfall And/Or Sunrise
For more adjusted presentation, you ought to shoot near to when the sun sets or when the sun begins to rise. Shooing amid late morning regularly comes about in pictures that have as well much differentiate. Not as it were that, but you’ll battle to capture key subtle elements in the landscape.
Here’s a tip: get to your area some time recently the dawns and begin snapping pictures of the scene as the dawns and inside 20-30 minutes of the sun rising. Do the same thing when the time nears for the sun to set. Don’t disregard to take pictures as the sun is setting, and at that point spend another 20-30 minutes taking pictures photeeq depth of field after the sun has set.
Use A Tripod
Start utilizing a tripod if you right now don’t utilize one. A tripod can progress your scene photography abilities by avoiding blurriness in your photographs. For occurrence, obscuring can happen when a camera’s shade speed gets to be as well low.
Another reason why a tripod can move forward your scene photography abilities is that it offers solidness in all sorts of climates. Be it a somewhat stormy day or amid a blast of wind, a tripod will offer assistance you snap still pictures of the scene you’re taking photographs of.
Analyze Other Photographers’ Work
A great way to move forward your scene and nature photography aptitudes is to carefully analyze other photographers’ work. There are numerous skilled scene picture takers out there, so take time to discover a few on YouTube, blogs and social media. Discover at slightest a few scene picture takers and analyze their pictures at slightest a few times per week for a few weeks.
When looking at others’ work, inquire yourself why you are drawn to particular photographs and why you cherish certain highlights. Analyze the colors in the photo, as well. The key is to take a long difficult see at everything in the photographs you’re analyzing.
The more you analyze other photographs, more propelled you will ended up and you’ll be able to apply what you’ve learned from analyzing others’ photeeq depth of field work.
Facts:
- Depth of field (DoF) refers to the portion of a photograph that appears acceptably sharp.
- Aperture size impacts DoF – A wider aperture (lower f-stop) creates a shallower DoF, while a smaller aperture (higher f-stop) increases DoF.
- Focal length matters – Telephoto lenses (longer focal length) create a shallower DoF, while wide-angle lenses provide a deeper DoF.
- Distance to the subject – The closer you are to the subject, the shallower the DoF; moving farther increases it.
- The circle of confusion determines what is perceived as sharp based on viewing distance and sensor size.
- Hyperfocal distance helps maximize DoF, ensuring objects from a specific point to infinity remain sharp.
- Avoid overusing filters – They can reduce image sharpness if not used correctly.
- Best shooting times – Photographing around sunrise or sunset ensures balanced exposure and better details.
Summary:
Your article discusses the concept of depth of field (DoF) in photography, explaining how it influences the sharpness of images. It covers key factors affecting DoF, including lens aperture size, focal length, and distance from the subject. The article highlights the balance between sharpness and background blur, explaining how different settings impact an image’s composition. It also introduces technical aspects like the circle of confusion and hyperfocal distance, which help photographers achieve desired focus effects. Lastly, it offers practical tips, such as shooting during sunrise/sunset for better photeeq depth of field lighting and avoiding overuse of filters to maintain image clarity.
FAQs:
1. What is depth of field in photography?
Depth of field (DoF) is the range of distance in a photograph where objects appear acceptably sharp. It is controlled by factors like aperture, focal length, and subject distance.
2. How does aperture size affect DoF?
A larger aperture (small f-number, e.g., f/1.8) results in a shallow DoF, making the background blurry. A smaller aperture (large f-number, e.g., f/11) increases DoF, keeping more of the image in focus.
3. What is the best way to get a blurred background?
To achieve a blurred background, use a wide aperture (e.g., f/2.8), a longer focal length (e.g., 85mm or more), and position the subject further from the background.
4. What is hyperfocal distance, and why is it important?
Hyperfocal distance is the focusing point that maximizes DoF, ensuring that everything from a certain distance to infinity appears sharp. It photeeq depth of field is useful in landscape photography.
5. How does focal length impact DoF?
Longer focal lengths (e.g., 200mm) produce a shallower DoF, making backgrounds blurrier, while shorter focal lengths (e.g., 24mm) provide a deeper DoF, keeping more elements in focus.
6. When is the best time to take landscape photos?
Early morning (sunrise) and late afternoon (sunset) offer the best lighting conditions, reducing harsh contrasts and providing well-balanced exposures.
7. How do I maximize DoF in landscape photography?
Use a small aperture (e.g., f/8 to f/16), focus at the hyperfocal distance, and choose a wide-angle lens to capture more details in focus.
8. Should I always use filters in photography?
No, filters can reduce image sharpness. While they are useful for effects like polarizing or neutral density, it’s advisable to take test shots without them for clarity comparison.
9. What is the circle of confusion?
The circle of confusion is a measure of how small a point must be to be considered sharp. It depends on sensor size, viewing distance photeeq depth of field, and resolution.
10. Can I achieve both foreground and background sharpness?
Yes, by using a small aperture (high f-stop), focusing at the hyperfocal distance, and ensuring the subject is at an optimal distance from the camera.
Read More Product About Art At sattaz.net


